This I Know
Learned this song Sunday morning. Loving it in the middle of the week. :D
Learned this song Sunday morning. Loving it in the middle of the week. :D
I'm a nerd.
Also, I have multiple hard drives that I'm constantly juggling and shuffling around. It's very important that I don't get them mixed up as I transfer files around from drive to drive, so to keep things organized, I use custom drive icons for each HDD.
It's a simple little trick I learned early on when I switched to the Mac platform (a couple weeks after Dad took the training wheels off my bike). I wanted to make a post to try to explain the process start to finish. For the purposes of this post, I'm going to make my iTunes Music folder look the same as the iTunes App.

Find an icon that you want.
For starters, head here: Other World Computing
OWC (MacSales) put a great little starter set online that you can easily download. There are tons of these files all over the internet to seek out after these, but this will get you started.

What you want
Once you have those icons downloaded, click on one and hit "Command I" (that's a capital "eye" not a capital "one"). :)

What you've got
Now click on the Hard Drive you want to change and hit "Command I"

Now that both are pulled up, click on the little miniature logo on the information window for the first icon.

Hit "Command C" on the keyboard. Click on the icon in the other window, the receiving HDD, and hit "Command V"

Hope that explains it. It's a little different to explain via screenshots. Feel free to ask questions and if there is any real interest I'll make a fancy video. :D

We're editing and working through post-production on our video for the Biology Department at Henderson State. The small green square is are targeted timeframe. After over ten hours of editing, the blue squares represent only the BEST of the stories from the students and faculty.

It's going to be a TOUGH edit, there's a lot of great stories here to tell and get out about how special this department really is. :)
More from Alamo Media under the tab at the top menu.
This is such a good cover I just had to give it a dedicated post and send them some more traffic. I think these guys absolutely killed it. :)
I could keep my guitars in their cases out in the shop, but I don't like the thought of the temperature out there. :)
So, I went to Home Depot after church and spent $3 on a board and $6 on more screws that I could possibly use in my entire lifetime.
There were some particular standards I had established for myself.
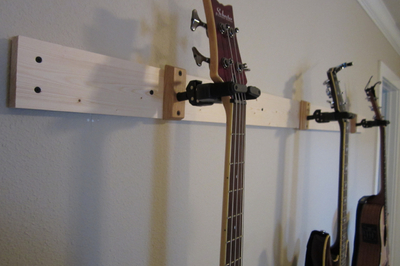
1. The wall is 100in, and I wanted the 72in board centered.
2. After that, I wanted the center guitar centered.
3. Instead of the outer guitars being spaced relative to the 72in board, I wanted them spaced out based on the wall's 100in span.
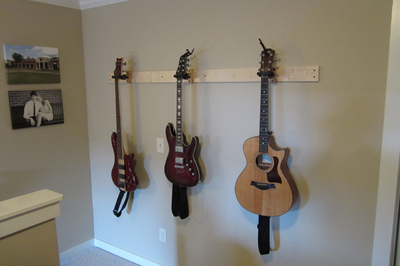
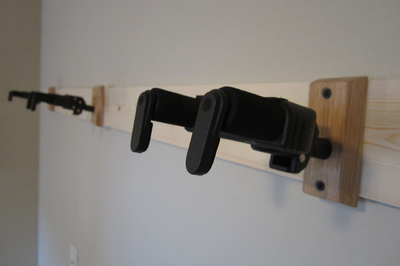
The guitars went up, even the heavy Bass over on the left.
I used the board so that I could spread the weight over 4 studs, but place the guitars how I wanted them. The studs are every 16in, but not necessarily placed where I'd like the guitars to hang.
It's looking good and I think it's got even a manly feel to it with the raw wood and black screws. I'd have the whole house looking like this but for Laura's sake I'll keep these little wood projects isolated to my desk area and the shop. :D
thanks for stopping by!
-Cameron